Embedded.
I sit with your team, on calls, on-site if needed.
15 years of experience brought in to help solve problems.
Robin Metcalfe
I combine…
…for companies with a story to tell, to deliver a platform experience that can pivot quickly and meet demand from both operators and visitors.
Real data, real stories
Pulling Salesforce data into WordPress listings
I worked with the NYC-based agency Studio Simpatico to build a data pipeline for their performing-arts foundation client. I connected the Salesforce API to their WordPress listings to keep events data fresh and accurate.
WordPress Read moreWordPress editorial flows
I worked with this journalism non-profit to improve editorial flows and modernise their block setup to deliver compelling article designs for their readers. Admin friction was down, reader engagement went up.
WordPress Read more2-year Laravel support partnership
I helped support and develop features for E-MusicMaestro, an aural-test and sight-reading practice site, maintained by a dedicated independent developer. I gained deep understanding of the relational data powering the site.
WordPress Read moreAs the data behind a website grows more complex, the tools for managing it have to keep up. I design admin interfaces that keep data-intensive sites accurate, well-structured and quick to search.
Data entry shouldn’t just work well, it should feel satisfying. Validation runs as you type, not after you hit save. Length limits, formats and missing matches flag the instant they happen, so data goes in clean the first time and nobody has to redo it.
In a well-known 2009 test, validating inline, as you fill the form rather than after you submit, cut errors 22% and completion time 42%.
Real records are tangled: a product links to a supplier, the supplier to its terms. Drill straight down the relationship and change a value three levels deep, with a breadcrumb keeping you oriented the whole way.
A breadcrumb lets you recognise where you are instead of having to hold it in memory.
Write naturally, drop in a field or a product image, and pick how it’s laid out. Everything binds to the live record by path and renders into the designed output. Switch the record and every bound value updates at once.
Change the record and every bound field updates at once, so you always see the current state, never a stale copy.
Search is the feature everyone needs and almost nobody builds well. One box that reaches across every model at once (products, suppliers, invoices, contacts, orders, categories), grouped by type, ranked by relevance, so the thing you want is two keystrokes away, not buried five screens deep.
Grouping results by type gives a stronger “information scent”, so the right one stands out instead of hiding in a flat list.
A few things are easy to picture: staff, locations, roles, documents. The relationships between them are what grow, and that’s the part the admin side has to keep straight.
Users with a name and a few details.
Staff with roles and departments, and availability that shifts across different locations.
Posts and pages.
Articles with taxonomies, PDFs generated from press releases, and older content moved into an archive.
Products in a shop.
Products with multi-faceted filters and deep categorisation.
The more the pieces relate to each other, the harder the admin side has to work to keep everything accurate, findable and secure. That’s the part I build.
Hi, I’m Robin Metcalfe. I work with clients and agencies worldwide to deliver CMS platforms and websites built on data relationships.
From a local business to a large multinational, all businesses find themselves needing to keep their data consistent and accessible to the right people at the right time.
I work primarily with Laravel and WordPress to integrate beautiful designs with relational databases via efficient and intuitive forms and front-end templates.
By understanding a client’s data requirements on a fundamental level, I can build the tools they truly need, intuitive and error-free.
Have you got data relationships to manage?
Get in touch.
Side projects with real purpose
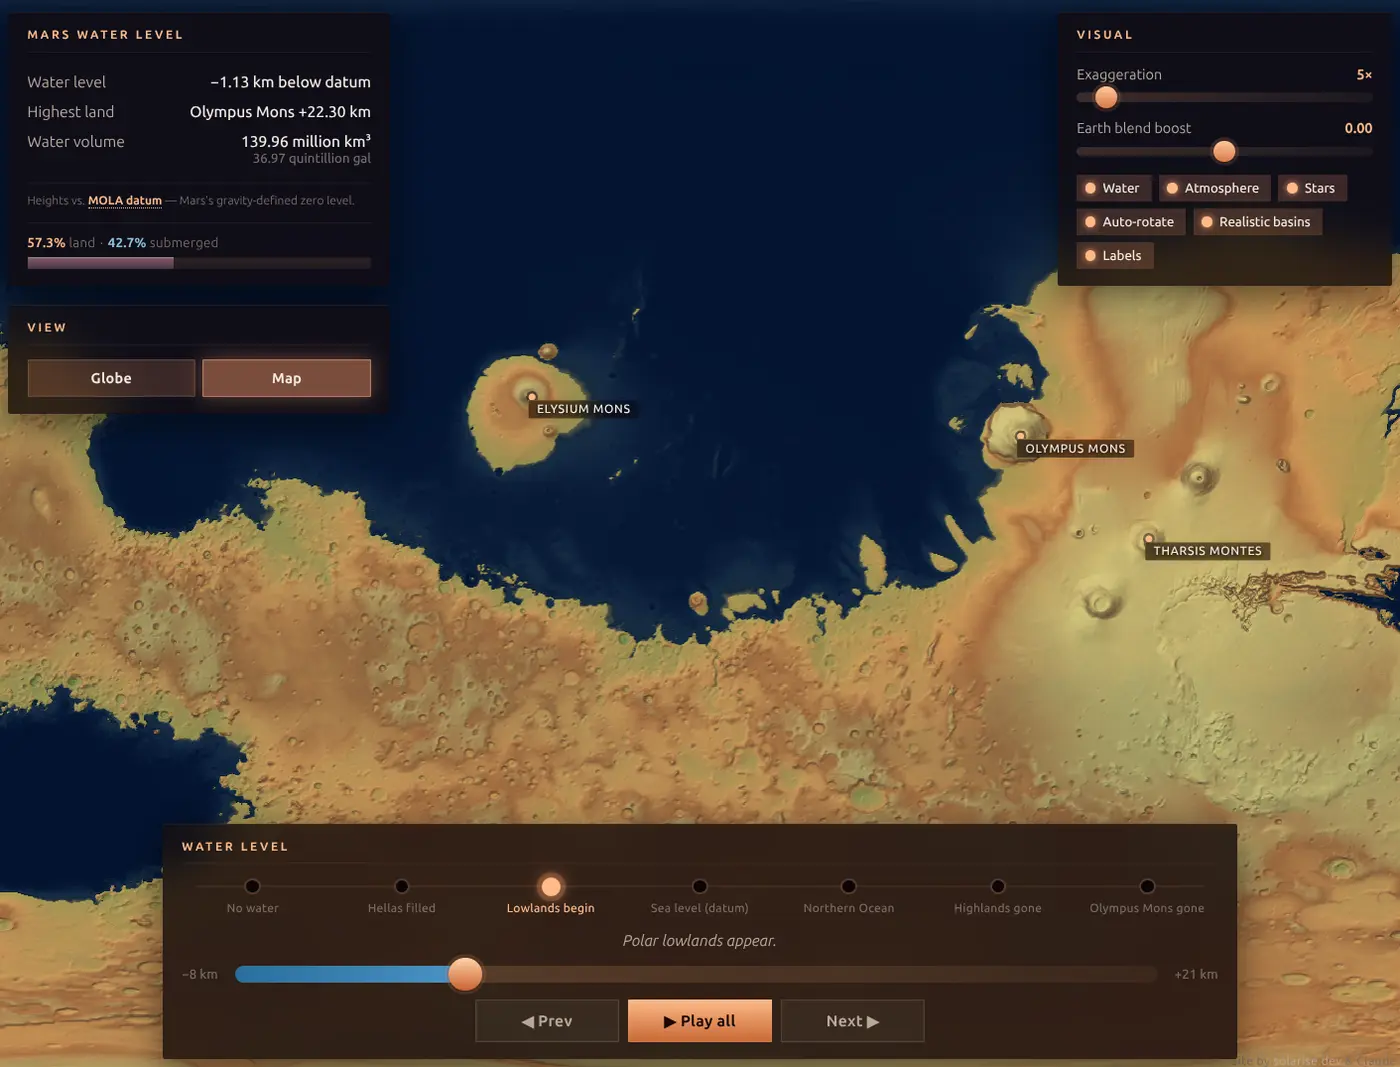
A real-data Mars water-level visualiser. Drag the slider, the planet actually floods the way the elevation data says it would.
Six Verticals, One Engine
A single CMS that produces six wildly different finished sites (allotment, charity, council, museum, scout group, theatre) by tuning an LLM per vertical.
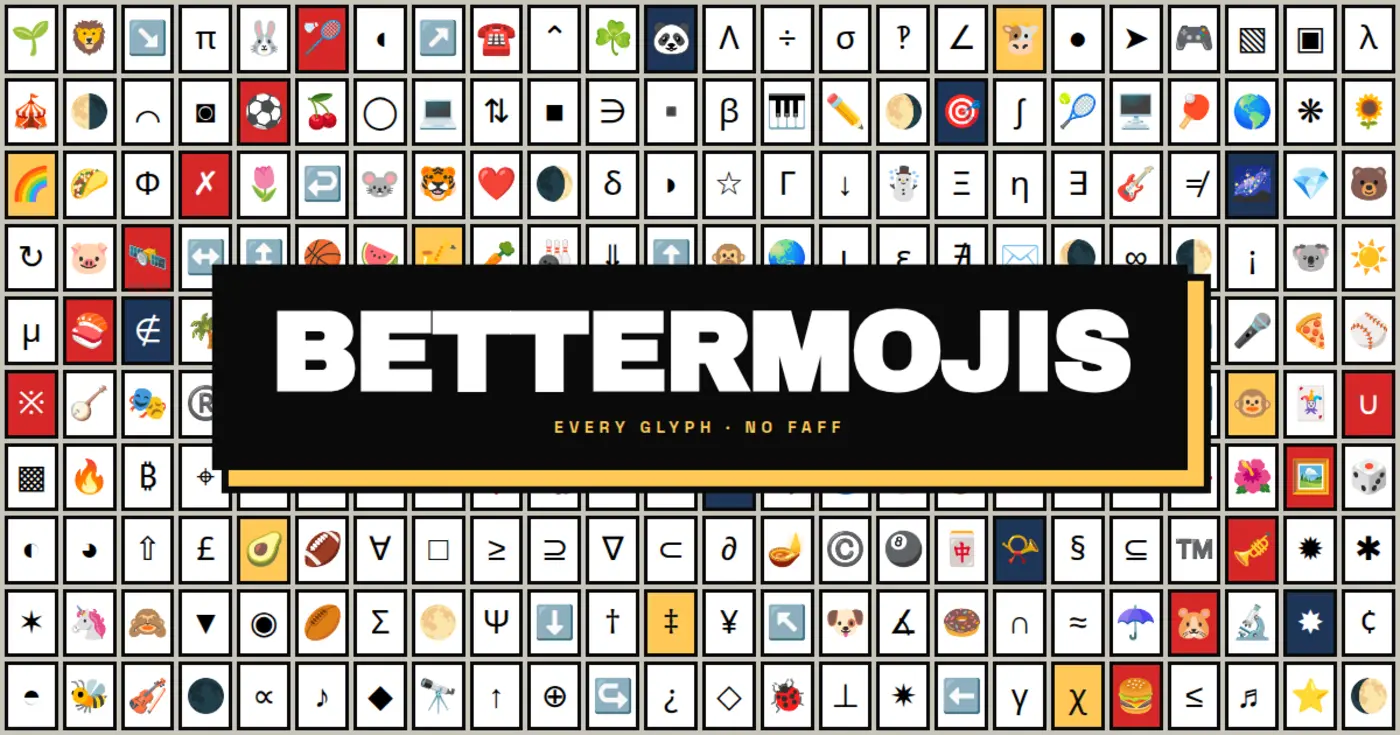
Every Glyph, No Faff
A no-faff browser for ~7,000 emoji, HTML entities and named Unicode symbols. Search in 15 languages, click to copy. Pure client-side.
I sit with your team, on calls, on-site if needed.
15 years of experience brought in to help solve problems.
I work with PMs and designers to clarify brief and interface.
We work in tandem to ensure the end product gets a clean hand-off and stays fully transparent to your team.
To kick things off, a 30 minute call to go over your current stack.
Sounds good? Let's get to it.
Book a call →Inherited stack, complex integration, project that wants a senior hand? Tell me what you're working on.
Replies from [email protected]. Pricing on request.
Want a steady hand on the codebase? Ready for senior support on the stack?
Most of what I get hired for is CMS work. But I've always enjoyed exploring the more creative side of the web. Interactive animations, generative artworks, curious little apps.
The web doesn't have to be purely functional.
I love cubes. I don't know why. Something about the simplicity of unit-sided cubes sliding in and out of view - there's a precision to that which I find genuinely satisfying.
The experiments page has more in this vein if you want a longer look at the things I get up to when nobody's paying me.